System Admin Wizard (SAW)
Introduction and Access
The System Admin Wizard (SAW) is a feature that allows you to manage and edit the content for JAVLN Officetech Task Categories, Task Statuses, Task Priorities, Task Subjects, File Descriptions, File Subjects and Naming Conventions Access to the System Admin Wizard is via the Administration icon at the top of your screen and is only available to those with System Admin Wizard Permissions.

Functions
The System Admin Wizard function provides control of what Users can see when accessing the various drop down menus in JAVLN Officetech
Task Categories
Task Categories can be created, edited and deleted and once created will be available as a drop-down option in JAVLN Officetech Tasks.
To Add a new Task Category:
- Open the System Admin Wizard function
- Select the Task Categories
- Click Create
- Type your new Task Category. You can also allocate a colour to the category if required
- Click Create
Edit a Task Category
- Open the System Admin Wizard function
- Select Task Categories
- Click on any of the available Task Categories in the Task Category panel of the window to edit the selected Task Category
- Click Edit and a pop-up window will appear with the name of the currently selected Task Category highlighted
- Type the new name for your selected Task Category. You can also change or allocate a new colour to the category if required. Editing a Task Category will update the category name on all existing Tasks with the previous category name.
- Click Save
- The edited Task Category will now appear in the Task Category panel of the window
Delete a Task Category
- Open the System Admin Wizard function
- Select Task Categories
- Click on any of the available Task Categories in the Task Category panel of the window to delete the selected Task Category and select Delete

- A pop up window will appear asking if you are sure your want to delete the Task Category, click Yes
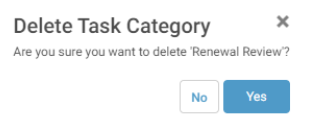
- The selected Task Category will be removed instantly from the Task Category panel of the window
- The deleted Task Category will no longer be available from the Category drop down menu in the JAVLN Officetech Task Window
- If a Task Category is assigned to any Tasks, you will receive a warning that you cannot delete the Task Category
Additional Functions for Task Categories



Task Statuses
Task Statuses can be created, edited and deleted and once created will be available as a drop-down option in JAVLN Officetech Tasks. Task Statuses can be used as a Workflow tool to enable a User to easily ascertain what stage of any particular transaction they are currently up to. You can customise your Task Statuses to reflect your own businesses workflows & processes. You can also choose for certain Task Statuses to Complete a Task when selected in the Task by checking the Tick Box in the Completes Task column.
Add a New Task Status
- Open the System Admin Wizard function
- Select Task Statuses
- Click Create
- Type your new Task Statu
- Click Create
- The new Task Status will be available from the Status drop down menu in the JAVLN Officetech Task Window.
Edit a Task Status
- Open the System Admin Wizard function
- Select Task Statuses
- Click on any of the available Task Statuses in the Task Status panel of the window to edit the selected Task Status
- Click Edit
 and a pop-up window will appear with the name of the currently selected Task Status highlighted
- Type the new name for your selected Task Status
- Click Save
- The edited Task Status will now appear in the Task Status panel the window and also be available from the Status drop down menu in the JAVLN Officetech Task Window. Editing a Task Status will update the Task Status name on all existing Tasks with the previous Task Status name.
Delete a Task Status
- Open the System Admin Wizard function
- Select Task Statuses
- Click on any of the available Task Statuses in the Task Status panel of the window to delete the selected Task Status
- On the Toolbar, Click Delete

- The selected Task Status will be removed instantly from the left-hand panel of the window
- Click Save or Save and Close
- The deleted Task Status will no longer be available from the Status drop down menu in the JAVLN Officetech Task Window
Task Priorities
Task Priorities can be created, edited and deleted and once created will be available as a drop-down option in JAVLN Officetech Tasks. Task Priorities allow you to allocate the urgency of the Task.
Add a New Task Priority
- Open the System Admin Wizard function
- Select Task Priorities
- Click Create

- Type your new Task Priority. You can also allocate a colour to the Priority if required
- Click Create
- The new Task Priority will be available in the Task Priority window and also from the Priority drop down menu in the JAVLN Officetech Task Window.
Edit a Task Priority
- Open the System Admin Wizard function
- Select Task Priorities
- Click on any of the available Task Priorities in the Task Priorities panel of the window to edit the selected Task Priority
- Click Edit
 and a pop-up window will appear with the name of the currently selected Task Priority highlighted
- Type the new name for your selected Task Priority
- Click Save
- The edited Task Priority will now appear in the Task Priority panel of the window and will be available from the Priority drop down menu in the JAVLN Officetech Task Window
Delete a Task Priority
- Open the System Admin Wizard function
- Select the Task Priorities tab
- Click on any of the available Task Priorities in the Task Priorities panel of the window to delete the selected Task Priorities
- Click Delete
- The selected Task Priorities will be removed instantly from the Task Priorities panel of the window
- The deleted Task Priority will no longer be available from the Priority drop down menu in the JAVLN Officetech Task Window
- If a Task Priority is assigned to any Tasks, you will receive a warning that you cannot delete the Task Priority

Task Subjects
Task Subjects can be created, edited and deleted and once created will be available as a drop-down option in JAVLN Officetech Tasks. Task Subjects can be created to assist Users with information as to what that Task is about, however, Task Subjects can also be integrated via your Broker product, i.e. INSIGHT to automatically prepopulate the Client’s policy data in the Task Subject field.
Add a New Task Subject
- Open the System Admin Wizard function
- Select Task Subjects
- Click Create

- Type your new Task Subject name
- Click Create
- The new Subject will now appear in the Task Subject window and will also be available from the Subject drop down menu in the JAVLN Officetech Task Window
Edit a Task Subject
- Open the System Admin Wizard function
- Select Task Subjects
- Click on any of the available subjects in the Task Subjects panel of the window to edit the selected Task Subject
- Click Edit
 and a pop-up window will appear with the name of the currently selected Subject highlighted
- Type the new name for your selected Task Subject
- Click Save
- The edited Task Subject will now appear in the Task Subjects panel of the window will also be available from the Subject drop down menu in the Task window
Delete a Task Subject
- Open the System Admin Wizard function
- Select Task Subjects
- Click on any of the available Task Subjects in the left-hand panel to delete the selected Task Subject
- Click Delete Subject

- The selected Task Subject will be removed instantly from the left-hand panel of the window
- The deleted Task Subject will no longer be available from the Subject drop down menu in the Task Window
Task Custom Field
Task Custom Fields allow you to create values as a drop-down list for Additional Fields that can be added to the Task Template section of JAVLN Officetech. Details on how to create and edit Task Templates will be covered later on in this manual.
To create Task Custom Fields:
- Open the System Admin Wizard function
- Select Task Custom Field
- Select Create, allocate a name to the Field and click Create
- Highlight the row containing your new Task Custom Field and select Create in the far-right hand window of the function. Upon selecting Create a pop-up window will open allowing you to create Value(s). Once completed, select Create.
- The values you have applied will create in the Value window.
Note: regardless of what order your load the Value during the creation, they will appear alphabetical in the Value window.
To Edit the value, highlight the relevant line and click Edit
 which will open the Edit window. Make the change required and select Save
To Delete the value, highlight the relevant line and click on Delete which will trigger a prompt to Delete the Value. Select Yes to Delete the Value.
The fields together with its values will now be available if added to a Task Template as an additional field. (See Task Template section for how to apply these fields)
File Descriptions
File Descriptions can be created, edited and deleted and once created will be available as a drop-down option in the JAVLN Officetech saving functions.
Add a New File Description
- Open the System Admin Wizard function
- Select File Descriptions
- Click Create

- Type your new File Description name
- Click Save
- The new File Description will be available from the Descriptions drop down menu in the JAVLN Officetech Save and Upload Windows
Edit a File Description
- Open the System Admin Wizard function
- Select File Descriptions
- Click on any of the available descriptions in the File Descriptions panel to edit the selected description
- Click Edit
 and a pop-up window will appear with the name of the currently selected File Description highlighted
- Type the new name for your selected File Description
- Click Save
- The edited File Description will now appear in the File Descriptions of the window
Delete a File Description
- Open the System Admin Wizard function
- Select File Descriptions
- Click on any of the available File Descriptions in the File Descriptions panel to delete the selected File Description
- Click Delete

- A Popup window will appear asking if you want to delete the selected File Description. Click Yes and the File Description will be removed instantly from the File Descriptions panel of the window
- The deleted File Description will no longer be available from the Descriptions drop down menu in the JAVLN Officetech Save Window
File Subjects
File Subjects can be created, edited, and deleted and once created will be available as a drop-down option in the JAVLN Officetech saving functions.
Add a New File Subject
- Open the System Admin Wizard function
- Select File Subjects
- Click Create
- Type your new File Subject name
- Click Save
- The new File Subject will be available from the Subject drop down menu in the JAVLN Officetech Save and Upload Windows
Edit a File Subject:
- Open the System Admin Wizard function
- Select File Subjects
- Click on any of the available subjects in the File Subjects panel of the window to edit the selected Subject
- Click Edit and a pop-up window will appear with the name of the currently selected File Subject highlighted
- Type the new name for your selected File Subject
- Click Save
- The edited File Subject will now appear in the File Subjects panel of the window
- Click Save or Save and Close
- The edited File Subject will be available from the Subject drop down menu in the OfficeTech Save Window
Delete a File Subject
- Open the System Admin Wizard function
- Select File Subjects
- Click on any of the available File Subjects in the File Subjects panel to delete the selected File Subject
- Click Delete File Subject
- The selected File Subject will be removed instantly from the File Subjects panel of the window
- Click Yes
- The deleted File Subject will no longer be available from the Subject drop down menu in the JAVLN Officetech Save Window
Naming Conventions
The Naming Convention tab can be used to add, edit and remove the Naming Conventions available in JAVLN Officetech when saving and naming or renaming files.
Note: The Naming Conventions of “ic-incoming correspondence” and “oc-outgoing correspondence” must be retained as they auto linked to Outlook emails – incoming and sent items.
Add a New Naming Convention
- Open the System Admin Wizard function
- Select Naming Conventions
- Click New Naming Convention
- Type your new Naming Convention
- Click Add
- The new Naming Convention will be available from the Type drop down menu in the JAVLN Officetech Save Window
Note: A Naming Convention must be in the following format: xx - name of naming convention
Edit a Naming Convention
- Open the System Admin Wizard function
- Select Naming Conventions
- Click on any of the available Naming Conventions in the Naming Conventions panel of the window to edit the selected Naming Convention
- Click Edit and a pop-up window will appear with the name of the currently selected Naming Convention highlighted
- Type the new name for your selected Naming Convention
- Click Rename
- The edited Naming Convention will now appear in the Naming Conventions panel of the window
- Click Save
- The edited Naming Convention will be available from the Type drop down menu in the JAVLN Officetech Save Window
Delete a Naming Convention
- Open the System Admin Wizard function
- Select the Naming Conventions tab
- Click on any of the available Naming Conventions in the left-hand panel to delete the selected Naming Convention
- Click Delete Naming Convention
- The selected Naming Convention will be removed instantly from the left-hand panel
- Click Save or Save and Close
- The deleted Naming Convention will no longer be available from the Type drop down menu in the JAVLN Officetech Save Window
Was this article helpful?
That’s Great!
Thank you for your feedback
Sorry! We couldn't be helpful
Thank you for your feedback
Feedback sent
We appreciate your effort and will try to fix the article